Updated July 2019: These are specific instructions for use in Transposit. For other methods, check the Slack API website.
By registering your app's capabilities as message actions, users can pick and choose messages to send to your app so you can do something useful with them. Store these messages in a virtual trapper keeper, feed them to your internal markov chain bot, or file away information about an important lead.
Creating "ClipIt" app using an action and a dialog#
This fictional Slack app, "ClipIt" allows users to "clip" a message posted on Slack by using the actions to export the message to JSON to be used in the external 3rd party app/service, let's say, "ClipIt web app".
Developer Use-Cases#
If you are developing apps like memo / note-taking app, collaborative doc app, this sample use-case would be a nice addition to your Slack app.
Also, the message action would be great for:
- Bug / issue tracking app (e.g. "Create a ticket from the message")
- To-Do app (e.g. "Create a to-do")
- Project management app (e.g. "Attach to task")
- Social media (e.g. "Post it to [my social media] App")
User Work Flow#
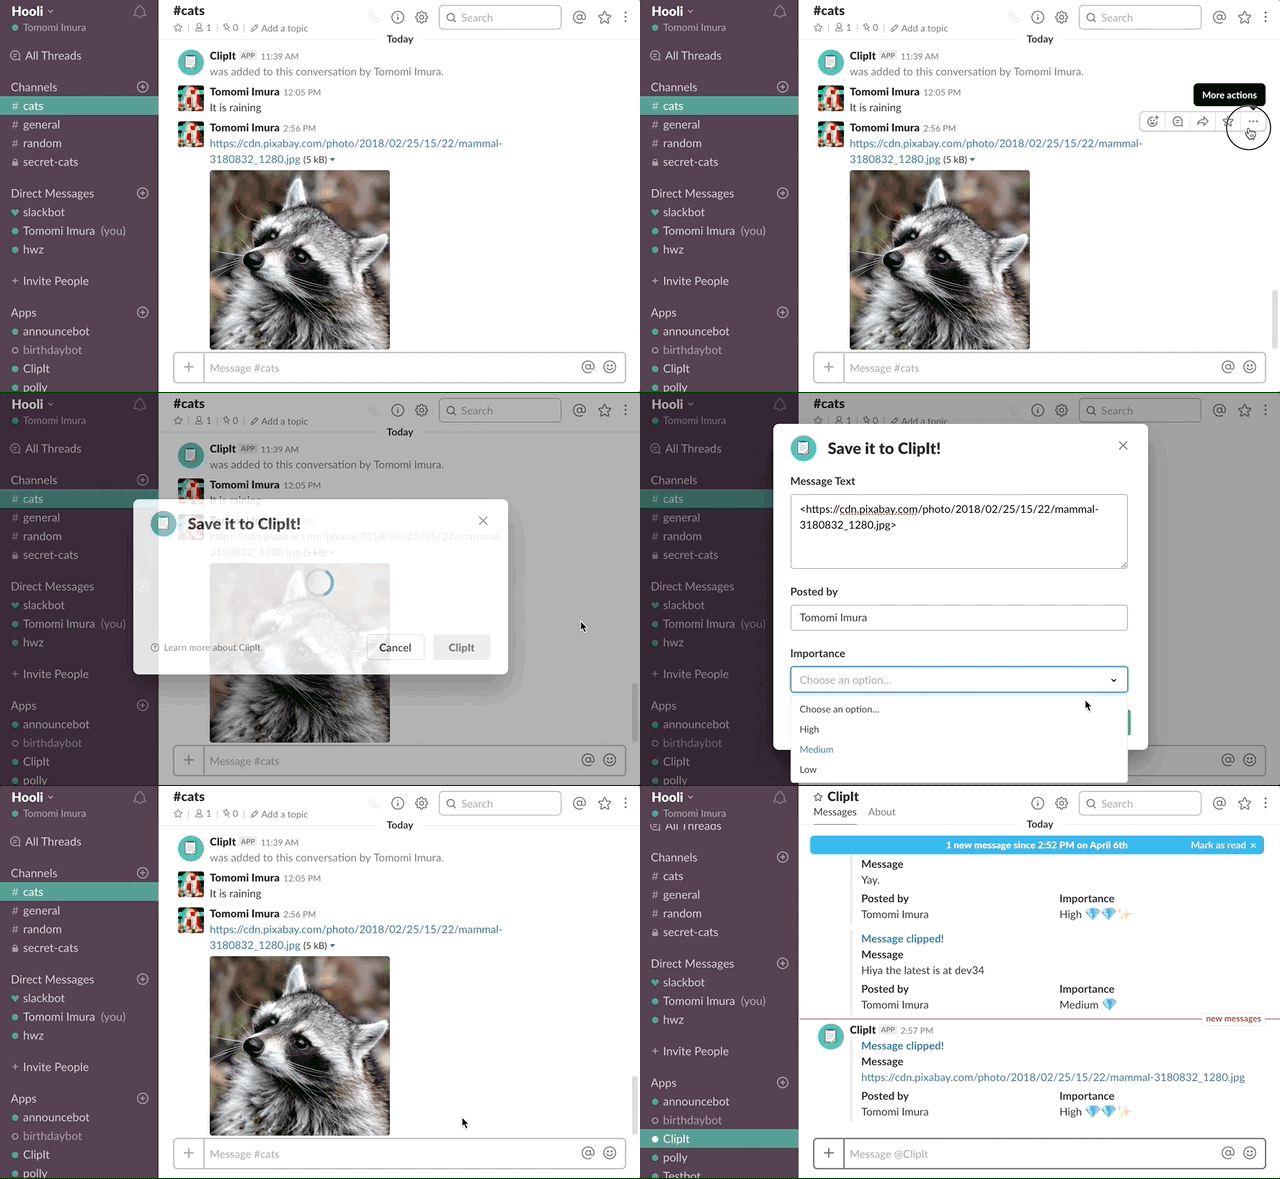
When a user hover a message then choose "Clip the message" from the action menu, a dialog pops open.
The message text is pre-populated into the dialog box, but the user can edit before submitting it too.
Once a user finalize the form and submit, the app DMs the user with the confirmation.

Setup#
Create a Slack app#
- Create an app at https://api.slack.com/apps
- Go to Bot Users and click "Add a Bot User" to create a, app bot. Save the change.
- Navigate to the OAuth & Permissions page and add the following scopes:
commands(required for Actions)users:read(need to get user info e.g. full names)chat:write:bot(required for posting messages)
- Add https://accounts.transposit.com/oauth/v2/handle-redirect as a Redirect URI.
- Click 'Save Changes' and install the app
Create your Database in Airtable#
- Add a new base in Airtable. If you are new to Airtable, check out their Support Center.
- Modify your table with the name
ClipItand- First column
messagewith type "Long text" - Second column
posterwith type "Single line text" - Third column
importancewith type "Single select" and optionsLow,Medium, andHigh
- First column
Fork in Transposit#
Configure your Slack App's connection to Transposit:
- Find your Client ID and Secret in your Slack app under Basic Information > App Credentials.
- In your Transposit app, go to Data connections > Slack > Authentication and change the values to your Slack app's Client ID and Secret.
Add Airtable and Slack's keys to production under Deploy > Production Keys and follow the instructions.
Authenticate the Airtable environment variables in Transposit under Deploy > Environment Variables.
Add an Action#
- Go back to the app settings and click on Interactive Components.
- Click "Enable Interactive Components" button:
- Request URL: The generated webhook url for
newuserin Transposit under Deploy - Under Actions, click "Create New Action" button
- Action Name:
Clip the message - Description:
Save this message to ClipIt! app - Callback ID:
clipit
- Action Name:
- Request URL: The generated webhook url for
- Save
Transposit Functions#
clipit: The operation that is called when you call Clipit.
create_record: Saves the Clip to an Airtable project.
id_to_name: A helper API call to convert an ID to a name.
open_dialog: The Slack API call to open the Clipit dialog.
post_confirmation: The Slack API call to post the Clipit confirmation message.

